Hey guys,
This post is all about one of my most interesting projects – building a milk vending machine prototype using ESP32, QR code scanning, and a simple website. I’ll share exactly how I started, tested, and what mistakes I made so you can also learn.The Idea – Why a Milk Vending Machine?
One day I was thinking, “We always buy milk packets from shops, but what if there’s a machine where people can just pay, scan, and get fresh milk automatically?” This idea got stuck in my head. I didn’t have all the parts, but I decided to make a prototype first to test the concept.What I Needed for the Prototype
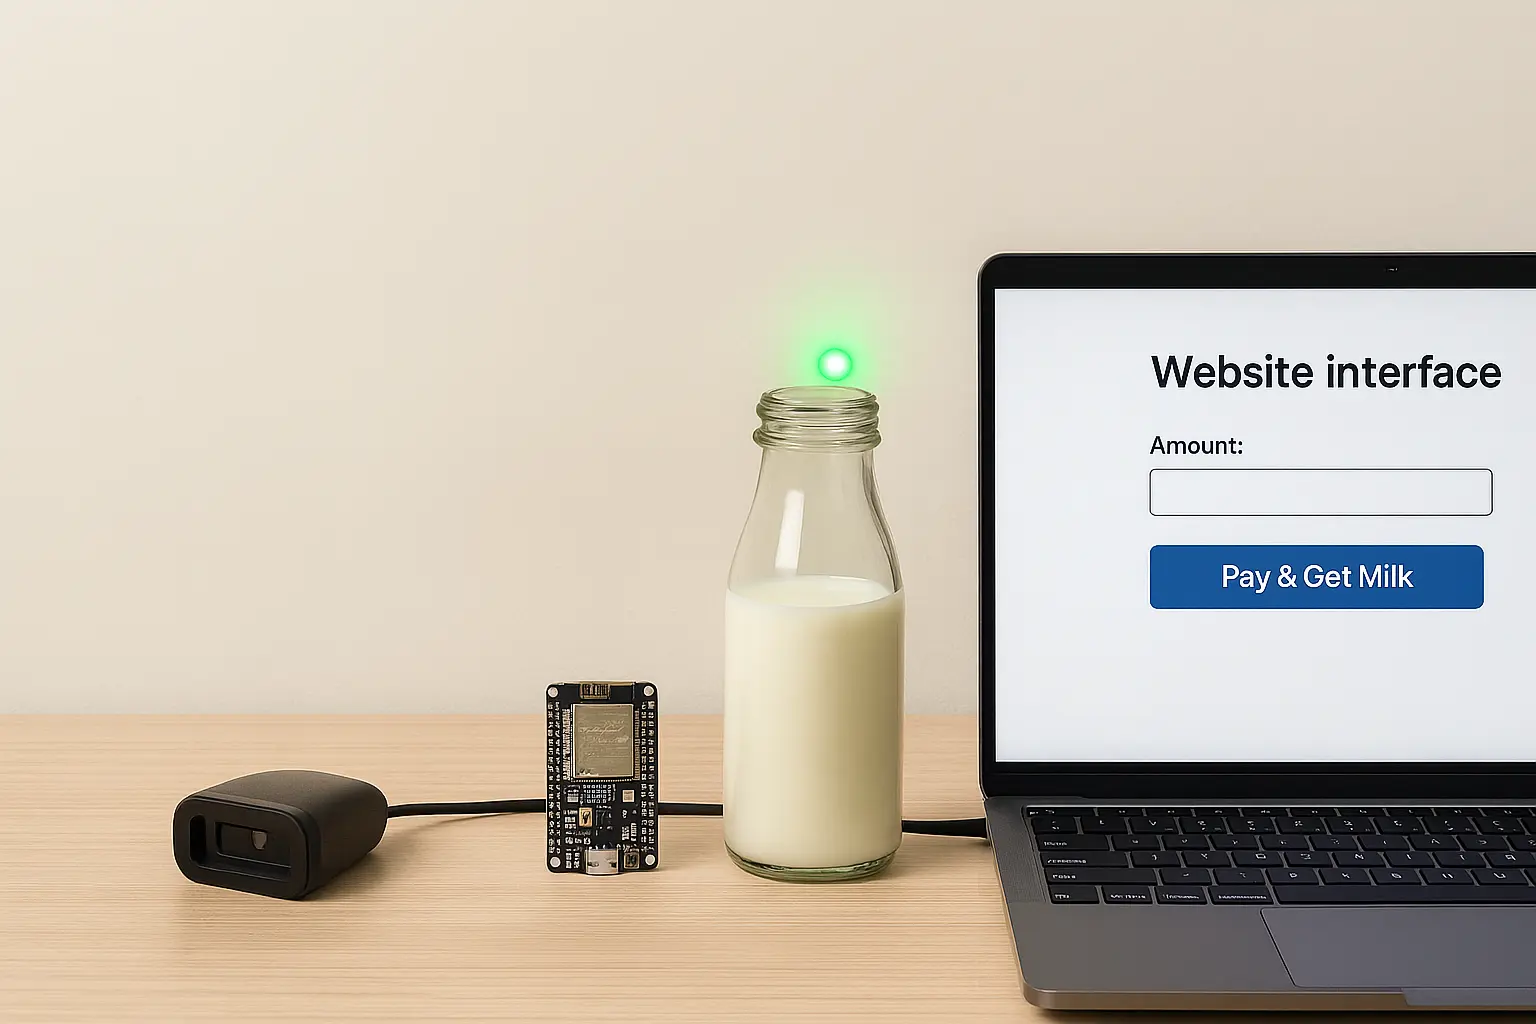
I made a small plan and listed the components: 1.ESP32 board: This is the brain of the system (because it has Wi-Fi). 2.QR code scanner: To scan the payment or customer code. 3.Website interface: For users to select the amount of milk and pay. 4.Relay + Pump (later): To dispense milk, but initially I used an LED as a placeholder.Step 1: Setting Up ESP32
I started with my ESP32 module. Installed Arduino IDE, added the ESP32 board manager, and tested a simple LED blink sketch. This gave me confidence that the board was working fine.Step 2: Creating the Website
Next, I built a small website where users can choose the amount of milk and pay online. I used: -HTML, CSS, JS for the front-end. -A simple Firebase backend to store transactions temporarily. It was not a big fancy design – just a basic form with: -Amount field -Payment button🔗 Related: My Blogging Journey – How I Built My Blog & Applied for Adsense If you’re curious about how I built my own blog and learned Firebase basics, check out that post. It will help you understand how I connected my website with the vending machine prototype.
Step 3: QR Code Scanning
For the QR code part, I first tested using a simple QR code scanner module that can output the scanned data as serial input to ESP32. -- When a user scanned the code, ESP32 checked if the payment was done (mock verification for now). -- If payment = success → LED ON (later will be milk pump ON).Step 4: Connecting the Website & ESP32
This was the hardest part because the ESP32 needed to know which user paid. Here’s the simplified flow I built: -> User visits the website and enters the amount. -> Website sends data to Firebase (order ID + status). -> ESP32 reads from Firebase (checks if any new successful order exists). -> If found, it turns ON an LED (later the milk pump).HTML Code Sample I Used to Trigger Orders
<button onclick="placeOrder()">Pay & Get Milk</button>
Step 5: Testing the Setup
Since I didn’t have a pump and relay yet, I used a simple LED light: => Green LED = Milk dispensing => Off LED = Idle This way I could simulate how the final machine would work. I tested different flows: => User pays → QR scan → ESP32 LED ON => Invalid scan → No LED :) It worked!Challenges I Faced
-- Sync delay: Sometimes ESP32 took a few seconds to read Firebase updates. -- Scanner issues: Cheap QR scanners don’t always detect properly. -- Wi-Fi drops: ESP32 disconnected from Wi-Fi a couple of times. -- Payment integration: I haven’t added real payment gateway yet, just mock orders.What I Learned
> Building prototypes step by step is the best way. > Firebase is a good backend for small IoT projects. > ESP32 can handle web requests but you need to optimize code. > Testing with an LED first saved me from wasting milk in experiments 😂.Next Steps
1. Add a proper milk pump and relay. 2. Integrate UPI/Paytm payment gateway on the website. 3. Add a small display to show instructions to users. 4. Make it more secure and reliable before real-world use.👉 If you haven’t read my Full Tech Journey blog and my full Electronic Journey blog , check it out. You’ll understand how I even started learning ESP32 and Firebase from zero.
Comments